
Load-Bearing C Projects
A guide to building and maintaining nontrivial C projects of high quality.
Estimated reading time: 18 mins
May 23, 2021C can be a very fun language to program in, if you can set up your project well. A lot of what I know about managing C projects was learned the hard way by experimentation and studying other people’s code. This post is meant to be the guide I never had to organizing and polishing nontrivial C projects, as well as setting up Makefiles for building them and manpages for documentation.
For this post, I’m going to assume some knowledge of C programming, but not much experience working on larger, multi-file C projects. We’ll start with a simple “Hello world” command line utility and grow the project through incremental steps, explaining as we go.
Beginning a Project
Our program begins its life in a simple and traditional way:
/*
 * hello.c - A simple hello world program.
 */
#include <stdio.h>

int main(void)
{
    printf("Hello world!\n");
    return 0;
}
I like to start all of my files with a short, descriptive comment that says
what the file contains. It’s very easy to assume this information is so obvious
that it doesn’t need to be explicit, but I find that it’s surprisingly helpful,
especially when you start to have a lot of files. It might seem obvious when you
write it what a file like loader.c does, but it’s much less obvious
to someone else, or to future-you. A little comment like
loader.c - Contains code for loading serialized data helps a lot!
Make it a habit to start giving files descriptive headers right off the bat, and
you’ll be glad you did later. It doesn’t need to be anything too verbose, just a
single sentence can be enormously helpful.
In order to compile this program, you need to invoke a C compiler. On most
systems, cc (C Compiler) is a symbolic link to the
preferred compiler on that system: gcc on Linux, or
clang on MacOS. On MacOS, gcc is
actually a symlink to clang because so many people type
gcc when they should use cc. As a best
practice, I would recommend using cc instead of gcc
when compiling C programs. It’s a good reminder that there are other compilers
out there besides GCC. So, let’s compile and run our program:
$ cc hello.c -o hello
$ ./hello
Hello world!
Great, our program compiles and runs! However, typing
cc hello.c -o hello every time we want to recompile the program can
be a little tedious. make (specifically GNU Make in this blog post)
is a great way to set up how you want a project to compile. make
isn’t perfect, but it’s very simple to use for personal projects, and it’s
available on pretty much every system. There are a lot of alternative build
systems like automake or ninja or whatnot, but in my
opinion, they introduce a lot of complexity that isn’t needed for most projects.
If your project is so complicated that it needs a complicated build system, you
should reconsider how much of that complexity is truly necessary and how much of
it is due to overengineering.
Automating Builds with Make
The essence of how make works is it looks for a file called
Makefile, which contains a set of rules. Each rule follows a simple
pattern: output file, followed by its dependencies, then a shell command that
will use the dependencies to generate the output file:
hello: hello.c
    cc hello.c -o hello
In this case, that means “the file hello depends on
hello.c and can be built by running the command
cc hello.c -o hello”. Now, you can try building hello
using make:
$ make hello
make: 'hello' is up to date
Oh, it looks like nothing happened. That’s because the Makefile specifies
that the output file hello only depends on the input file
hello.c, and hello.c hasn’t been modified since we
compiled hello. Make will not recompile unless either the
output file does not exist, or the dependencies have a more recent file
modification time! Try making a trivial change to hello.c
and re-running make:
$ touch -m hello.c # Update the file modification time
$ make hello
cc hello.c -o hello
Great, it compiled!
If you don’t provide any arguments, make defaults to first rule
defined in the Makefile. In this case, that means the hello rule.
So, in our case, we can just run make instead of
make hello and it will do the same thing.
Cleaning Up
It’s sometimes nice to have a way to force recompilation even when
hello.c hasn’t changed. For example, if we want to rebuild the same
source code with different compiler flags. A common way to do this is to add a
“phony” clean rule that removes build files (“phony” here just
means that clean isn’t the name of an actual file, it’s just the
name of the rule):
.PHONY: clean
clean:
    rm -f hello
Now, we can run make clean and it will remove the build files
and let us rebuild:
$ make clean
rm -f hello
$ make
cc hello.c -o hello
Making Everything
Another common practice is to include a phony all rule as the
first rule in the file. This can sometimes be useful if you have multiple build
targets that you want to compile by default. For this example, there’s only one
target, so that would look like this:
.PHONY: all
all: hello
Notice that there’s actually no “body” to the rule, it’s just a phony target
with one dependency: hello. This means that running
make all involves nothing besides satisfying the precondition of
building hello. In this example, it’s probably not worth having
this rule, but keep it in mind as an option for if you have multiple build
targets.
Adding Compiler Flags
So far, we have a working Makefile, but sooner or later, it will be useful to have different compiler flags available (for example, warning flags, or optimization flags). The simplest solution is to just add those flags to the Makefile rule:
hello: hello.c
    cc -std=c99 -Wall -Wextra -Werror -O2 hello.c -o hello
However, this makes it tricky to quickly swap between different flag
settings. Instead, it’s better to use make variables to store the
flag values. I like to split the flags into four categories:
- Warning flags (
CWARN) - Optimization level (
O) - Debug flags (
G) - Everything else (
CFLAGS)
This is what it looks like in a Makefile:
CC=cc
CFLAGS=-std=C99
CWARN=-Wall -Wextra -Werror
O=-O2
G=

hello: hello.c
  $(CC) $(CFLAGS) $(CWARN) $(O) $(G) hello.c -o hello
Now, running make will use the default flags:
$ make
cc -std=C99 -Wall -Wextra -Werror -O2  hello.c -o hello
However, we can also manually specify flags, for example, if we want to do a debug build:
$ make G=-ggdb O=-O0
cc -std=C99 -Wall -Wextra -Werror -O0 -ggdb hello.c -o hello
Or we can even specify the compiler to use:
make CC=tcc
tcc -std=C99 -Wall -Wextra -Werror -O2  hello.c -o hello
Handling Multiple Files
At this point, we’re in a very good place when it comes to a single-file
project. We can run make whenever we want and it will ensure the
program compiles. However, if the project grows over time, it’s likely that
there will be a point when there’s too much code to put in a single file. As a
rule of thumb, I typically don’t let individual C files get more than 700 lines
long, but I won’t split into multiple files unless there is a clean demarcation
of functionality. Having code split into multiple files based on functionality
makes it easier for you (or other contributors) to find the code you’re looking
for, and makes it easier to understand changes in source control. However, if
you go too far and split everything into too many tiny files, then it becomes
tedious to have to hop across many different files when editing or reading code.
Each file should be relatively self-contained and modular–the public-facing API
should not change frequently, and non-API changes to the code in one file should
not require changes in another file.
For this example, let’s consider moving the hello-world-printing logic to a
separate file: greeter.c:
/*
 * greeter.c - The logic for greeting things.
 */

#include <stdio.h>

void greet(char *subject)
{
    printf("Hello %s!\n", subject);
}
If we want to use this code in our main program, our main program will need to import a header file so it knows what functions are available:
/*
 * greeter.h - Header file for greeting logic.
 */

void greet(char *subject);
/*
* hello.c - A simple hello world program.
*/
#include "greeter.h"
int main(void)
{
greet("world");
return 0;
}The next step is to tell our Makefile that we need to compile and link this new file as well:
hello: hello.c greeter.h greeter.o
    $(CC) $(CFLAGS) $(CWARN) $(O) $(G) greeter.o hello.c -o hello

greeter.o: greeter.c greeter.h
    $(CC) -c $(CFLAGS) $(CWARN) $(O) $(G) greeter.c -o greeter.o
Some things to notice:
- The
hellorule now has 3 dependencies:hello.c,greeter.h, andgreeter.o. If any of these files change,hellowill be rebuilt. - There is a new rule:
greeter.o. This is an object file that contains the compiled code ofgreeter.c.makeworks like a dependency tree, so ifgreeter.cchanges and you buildhello, it will rebuildgreeter.ofirst. - The rule for
greeter.ouses the compiler flag-c, which tells the compiler to not invoke the linker, just build an object file that can be used in the main program.
In theory, splitting into multiple files can also greatly improve
recompilation time because you can skip recompiling files that weren’t changed.
In this example, if you make changes to hello.c, but
greeter.c remains unchanged, then make will only
recompile hello, but reuse the existing greeter.o. In
practice, unless you’re running on an old Raspberry Pi, or have a truly massive
project (like an operating system), it will probably only take a few hundred
milliseconds to compile your entire project, so you won’t notice much of a
difference.
As you add more and more files, adding rules like this will get a bit
repetitive, but fortunately, make has some pattern matching rules
that allow you to write general-purpose rules. This is how I would normally
handle greeter.o:
%.o: %.c %.h
    $(CC) -c $(CFLAGS) $(CWARN) $(O) $(G) $< -o $@
The %.o: %.c %.h part is special Make wildcard syntax that means
“if you’re looking for how to build a file called foo.o, and
there’s no specific rule for it, then you can build it with this rule and the
dependencies foo.c and foo.h.” The $<
is a special Make variable representing “the first dependency”
(greeter.c), and $@ is a Make variable for for “the
output file” (greeter.o). The C file itself imports the
greeter.h header file, so the C compiler doesn’t need to be passed
the header filename, but it’s included in the Makefile because any changes to
the header should probably trigger a recompilation of
greeter.o.
And just to make things a little bit tidier, I like to put the C files that
will need to be compiled in their own make variable:
CC=cc
CFLAGS=-std=C99
CWARN=-Wall -Wextra -Werror
O=-O2
G=

HEADERS=greeter.h
CFILES=greeter.c
OBJFILES=$(CFILES:%.c=%.o)

hello: hello.c $(HEADERS) $(OBJFILES)
  $(CC) $(CFLAGS) $(CWARN) $(O) $(G) $(OBJFILES) hello.c -o hello

%.o: %.c %.h
    $(CC) -c $(CFLAGS) $(CWARN) $(O) $(G) $< -o $@

.PHONY: clean
clean:
    rm -f hello $(OBJFILES)
The OBJFILES=$(CFILES:%.c=%.o) part is make syntax
that sets the OBJFILES variable to whatever is in the
CFILES variable, but with .c replaced with
.o. With this setup, we can easily add new files to the project
just by updating HEADERS and CFILES.
Preventing Header Duplication
As the number of header files grows, you run the risk of importing the same
header file multiple times. This can happen if foo.h and
baz.h both #include "qux.h". This causes the compiler
to complain about redeclaring variables or types. However, there’s a simple fix:
wrap the header file in a #ifndef macro like this:
#ifndef FILE__GREETER_H
#define FILE__GREETER_H
/*
 * greeter.h - Header file for greeting logic.
 */

void greet(char *subject);

#endif
The name FILE__GREETER_H isn’t meaningful, it just has to be a
unique value that doesn’t collide with any names being used elsewhere. I tend to
go with FILE__<filename> as my template. This macro ensures
that if a file is #included multiple times, the subsequent includes
don’t appear and the compiler is happy.
C File Layout
At this point, we have a robust project setup that’s easy to compile and extend. That leaves the question of how to divide up the code among different files. The approach that I favor is to have:
- Header files containing datatype declarations and function declarations that are used in other files.
- One
.cfile for each header file containing function implementations. - One main
.cfile that includes themain()function and primarily handles command line argument parsing and invoking functions defined in other files.
Command Line Argument Parsing
Parsing command line arguments isn’t very fun, but it’s also not very
difficult. If you intend to run your program as a command line program, you
should support a few basic flags, like --help. Below is my general
approach to command line flags. It’s overkill for a program as simple as
hello, but it shows how you can begin to build a more feature-rich
command line tool:
/*
 * hello.c - A simple hello world program.
 */

#include <stdio.h>
#include <string.h>

#include "greeter.h"

#define startswith(str, prefix) (!strncmp(str, prefix, strlen(prefix)))

const char *description = "hello - A simple hello world program";
const char *usage =
  "Usage: hello <flags...>\n"
  "Flags:\n"
  "    --help|-h          Print this message and exit\n"
  "    --name=|-n <name>  The name being greeted";

int main(int argc, char *argv[])
{
    // Variables that get set by command line flags:
    char *name = "world";

    // Loop over command line arguments:
    for (int i = 1; i < argc; i++) {
        if (strcmp(argv[i], "--help") == 0) {
          print_help:
            printf("%s\n%s\n", description, usage);
            return 0;
        } else if (startswith(argv[i], "--name=")) {
            name = &argv[i][strlen("--name=")];
        } else if (argv[i][0] == '-' && argv[i][1] != '-') {
            // Single-char flags:
            for (char *c = &argv[i][1]; *c; c++) {
                switch (*c) {
                    case 'h': goto print_help;
                    case 'n':
                        name = (i+1 < argc) ? argv[++i] : "";
                        break;
                    default:
                        printf("Unknown flag: -%c\n%s\n",
                               *c, usage);
                        return 1;
                }
            }
        } else {
            printf("Unknown flag: %s\n%s\n", argv[i], usage);
            return 1;
        }
    }

    // Do the business logic:
    greet(name);

    return 0;
}
Minimum Viable Documentation
Documentation is often a hassle, but there three things you should really have:
- A README file
- A software license
- A manpage
README
The README file is the first thing to include. I like to use markdown (which
renders nicely on most platforms, but is also human-readable), so I’ll create a
README.md file like this:
# hello

This is a simple hello world project.

## Dependencies

There are no dependencies besides a C compiler and `make`.

## Building

Simply run `make` to build.

## Installing

Run `sudo make install` to install.

## Usage

After compiling, run `./hello`. See `man ./hello.1`
for more details.

## Code Layout

- `hello.c` The main program logic.
- `greeting.h`/`greeting.c` The implementation of
  the greeting.

## License

This software is released under the MIT license
with the Commons Clause, see `LICENSE` for more
details.
Software License
It’s good practice to include a software license with your projects. This lets others know what is or isn’t allowed. Personally, I like the Commons Clause applied to the MIT License. The Commons Clause is not very well known, and if you want to be pedantic, it’s not technically “Open Source”. However, I think the combination of MIT License with the Commons Clause is best aligned with my goals for freely distributing my work:
- My code is available for free
- Anyone can use it
- Anyone can view the source
- Anyone can modify it
- Anyone can redistribute it
- But if anyone wants to sell my work, they’ll need to get my permission first
Here is an example of a license file I would use.
Manpages
Manpages (manual pages) are a bit more of a pain in the neck compared to
READMEs and license files, but they’re not fundamentally very complicated.
man (the command) looks in a specified location for documentation
on a command. That documentation is written using roff typesetting. Here’s an example of a manpage file:
.\" Manpage for hello.
.TH man 1 "January 2, 2021" "0.1" "hello manual page"
.SH NAME
hello \- A hello world program

.SH SYNOPSIS
.B hello
[\fB-h\fR|\fB--help\fR]
[\fB-n\fR|\fB--name\fR=\fIname\fR]

.SH DESCRIPTION
\fBhello\fR is a hello world program. It greets things.

.SH OPTIONS
.B \-h\fR, \fB--help
Print a help message.

.B \-n\fR \fIname\fR, \fB--name\fR=\fIname\fR
Set the name being greeted. Default: \fIworld\fR

.SH EXAMPLES
.TP
.B hello
Print "Hello world!"

.TP
.B hello --help
Print the usage.

.TP
.B hello --name=\fIDave\fR
Print "Hello Dave!"

.SH AUTHOR
Harry Q. Bovik
And this is how it renders:
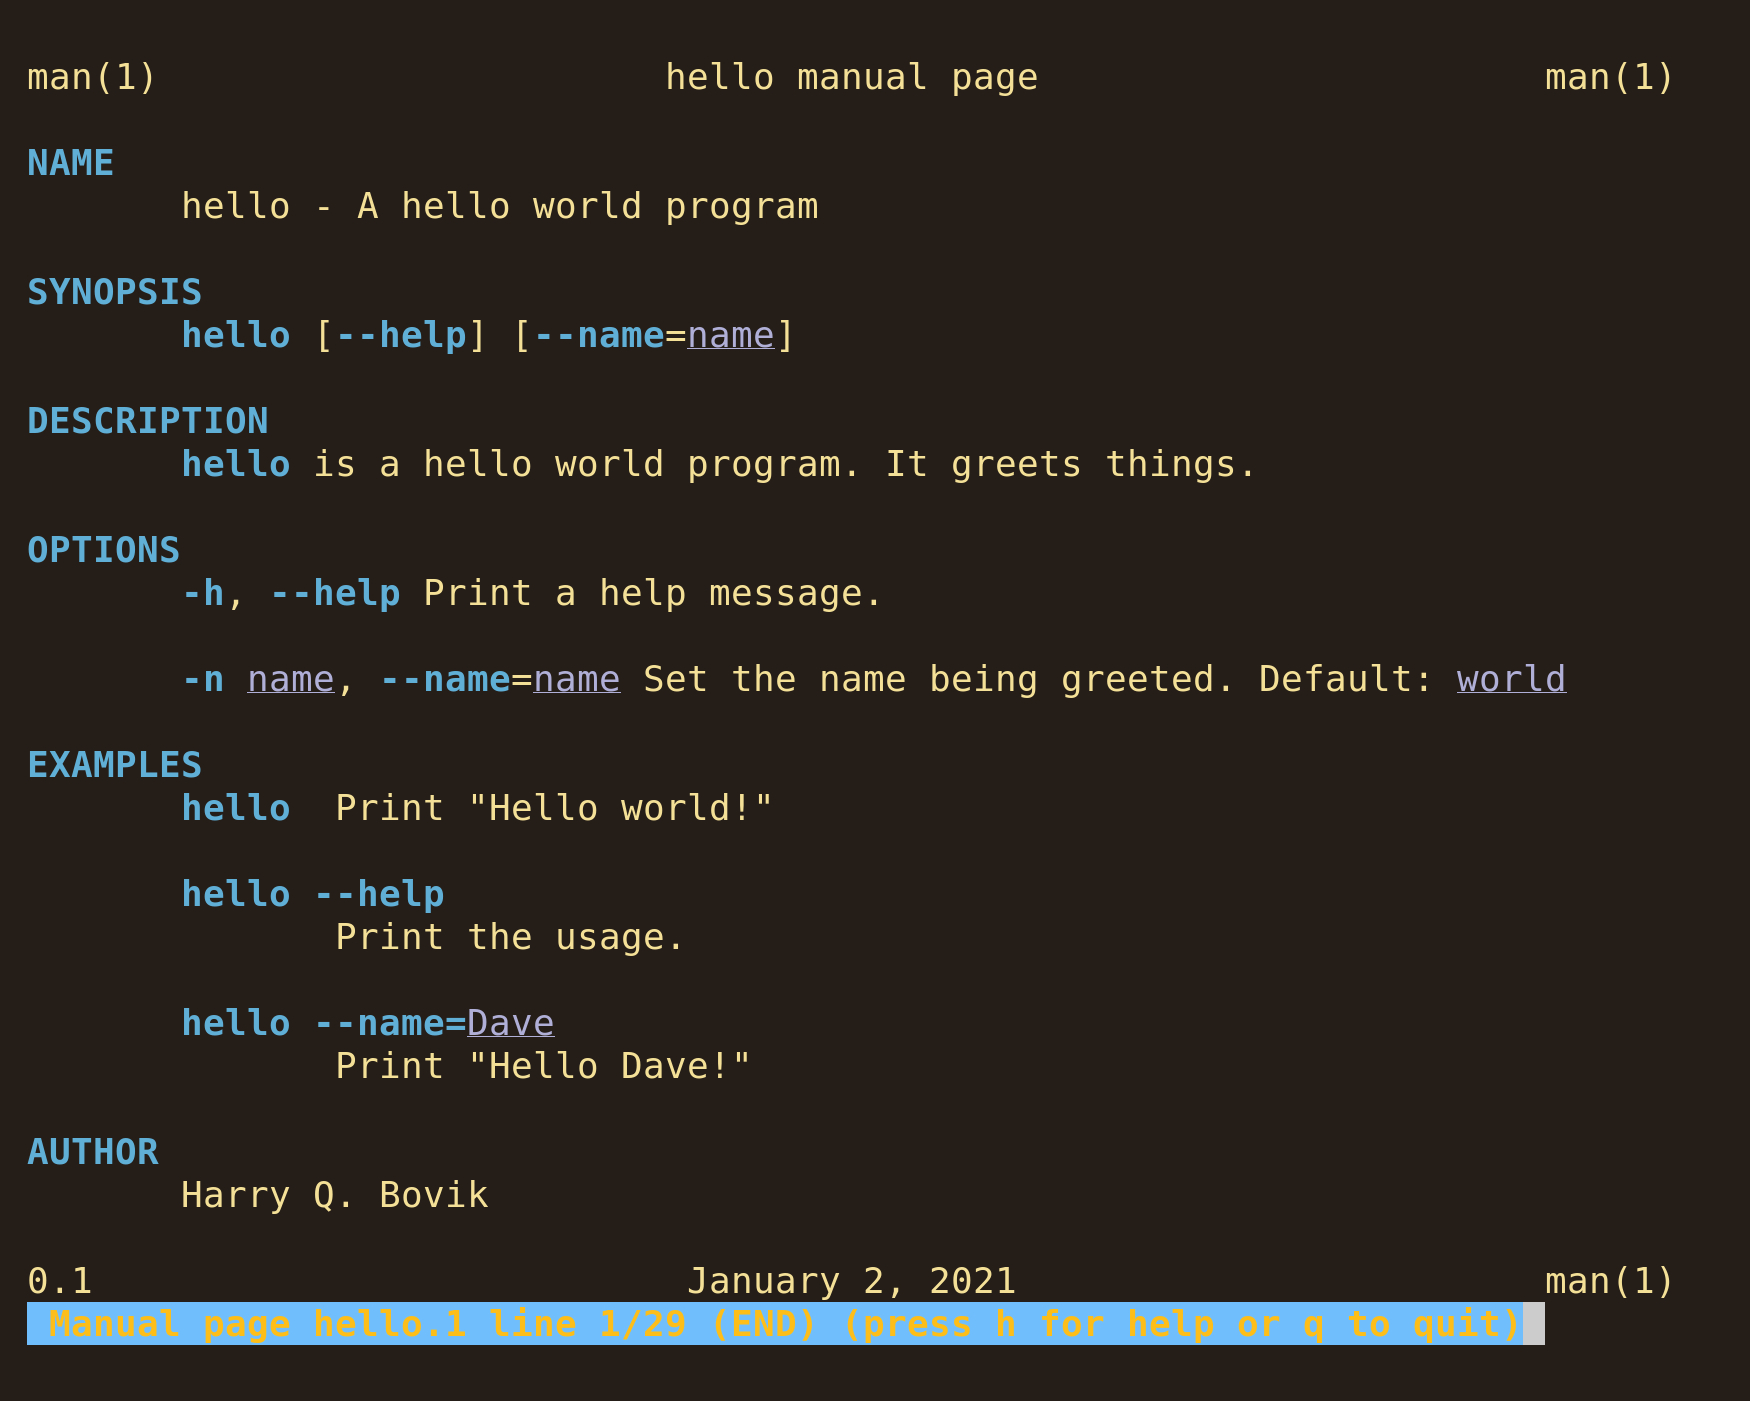
Fully explaining roff would require a separate blog post, but there are essentially only three things you need to know to write a manpage:
- Lines that begin with things like
.SHindicate a formatting directive for a line or section (.SHis section header, for example). - You can change the formatting of text inline with
\fI(italics),\fB(bold), and\fR(regular). These names are slightly misleading because on the terminal, “italic” text is rendered as lilac-colored and underlined, and “bold” text is rendered as blue and bold. - When you don’t know how to do something, you can just look at an existing
manpage to see how they did it. The simplest way to do this is
vim $(man -w foobar)which will show you the source code of the manpage forfoobar.
Once you have a manpage written out, the file should saved with the name
hello.1 (or whatever your program’s name is, followed by
.1). The 1 refers to the manual section number for
“executable programs and shell files”, which is what this is. See
man man for more details on the different sections.
If you want to preview your manpage, run man ./hello.1. You
must include the ./ prefix or use an absolute
path, otherwise man won’t be able to find your file. Eventually,
when you install the manpage file, it will either be put into
/usr/share/man/man1/ or /usr/local/share/man/man1,
depending on your system. In order to find the correct directory, you can run
man -w cat, which will tell you where the manpage for the
cat program is (any program will work).
Alternative: Using Pandoc for Manpages
As an alternative to writing manpages with roff typesetting, you can also
write them using Markdown (or your format of choice) and convert the text to
roff using Pandoc. Pandoc is a really handy tool for cross-compiling
between different document formats, and it plays very nicely with
make as well. Jérôme Belleman has written a nice, short
tutorial here, and Eddie Antonio has written a slightly more
in-depth tutorial here. If you do go this route, be sure to check the
Pandoc-generated manpages into your source control, so that your users don’t
need to have Pandoc installed to access the manpages.
Making Software Installable
At this point, we’re nearly done, there’s just one more thing left:
installing the program. We’ll need to add an install rule to our
makefile. This rule has two tasks: put a copy of the executable in the right
spot and put a copy of the manpage in the right spot. There are generally
standard locations where these things go, but it’s good practice to allow the
user to customize the install location with make flags if they want
to. Here’s what a simple installation rule would look like:
PREFIX=/usr/local
BINDIR=$(PREFIX)/bin
MANDIR=$(PREFIX)/man

.PHONY: install
install: hello
    mkdir -p -m 755 "$(BINDIR)" "$(MANDIR)/man1"
    cp hello "$(BINDIR)/"
    cp hello.1 "$(MANDIR)/man1/"
Also, I like to include an uninstall rule, just as a courtesy to
make it easier to cleanly uninstall programs:
.PHONY: uninstall
uninstall:
    rm -f "$(BINDIR)/hello" "$(MANDIR)/man1/hello.1"
Conclusion
And that’s everything! With all of this, you have a pretty swanky setup for a decently-sized C program that compiles, installs, and comes with documentation. This is essentially the same setup used by the Lua programming language’s source code, and by most suckless programs. It’s easy to maintain, and once you have a project with this setup, it’s very easy to copy over to a new project.
Here are the final files:
Epilogue: Languages Other than C
Most of the tips here apply just as well to projects in other programming
languages as well. For example, I write blog posts in markdown use Pandoc to convert
them to HTML, then use rsync to send them to my server. I have a
Makefile that handles all of that, and it looks something like this:
MD_FILES := $(shell find -name '*.md')
MD_GEN=$(MD_FILES:%.md=%.html)

all: $(MD_GEN)

%.md: %.html
    pandoc --defaults .pandoc/defaults.yml $< -o $@

sync: all
    rsync -a ./ www@bruce-hill.com:/var/www/

.PHONY: all sync
Hopefully after reading this post, you now have a clearer idea of how C projects can be organized, and how to make your own Makefiles and manpages. The tools and ideas described here have a very simple core, but are incredibly flexible and useful, so it’s well worth trying out on your next project. Thanks for sticking around to the end of this rather long post!